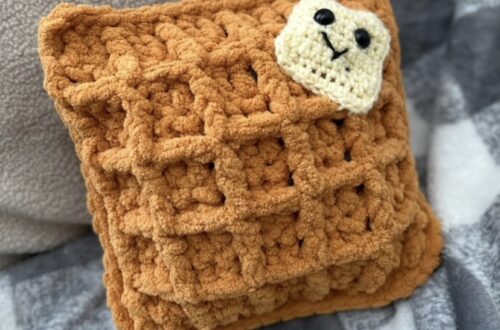
Gingerbread Stockings *crochet pattern*
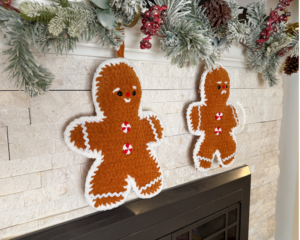
These crochet Gingerbread Stockings add a cozy, sweet touch to your holiday decor! Functional AND adorable, they instantly warm up any room! Create one with a smile or a frown, depending on if you want to be naughty or nice this season!
– Amy (@curiouspapaya)
MATERIALS:
- Clover Amour Hook (7 mm)
- Clover Amour Hook (2.75 mm)
- Clover Patchwork Scissors
- Clover Yarn Needle
- Clover Stitch Markers
- two 15 mm safety eyes
- one 10 mm red pom pom (for the nose)
- hot glue
- 1/2 in. (1.27 cm) Ric Rac trim (wavy ribbon for icing details)
- #6 super bulky yarn
- gingerbread color (140g)
- white (20g)
- #3 light worsted cotton yarn
- white (5g)
- red (5g)
NOTES:
- Please do not copy/redistribute any part of this pattern as your own. This includes reposting/translating without permission. Feel free to sell your finished products in small quantities as long as you give credit to help support my work. Tag your creations with @curiouspapaya so I can feature you!
- This pattern is written in US terminology.
- This pattern will be worked in rows and the peppermint buttons are worked in a joined round.
- In this pattern, I am using the “yarn under, yarn over” method of crocheting. This creates a slanted “x-shaped” stitch definition and it is my preferred method when using chenille yarn. You may crochet however you prefer!
- Difficulty: intermediate-beginner+
- Measurements: 14 in. x 10 in. [~36 cm x ~25 cm] if using the prescribed materials
- This pattern works up adorably in medium worsted yarn! It makes a cute mini gifts holder, great for gift cards, lip balms, or candy canes.
ABBREVIATIONS:
- blo: back loops only
- ch: chain
- dc: double crochet
- flo: front loops only
- dec: regular decrease (be sure to not use the invisible decrease as we normally do for amigurumi)
- inc: increase
- sc: single crochet
- slst: slip stitch
- st(s): stitch(es)
- rnd(s): round(s)
- [#]: stitch count
- (…) x #: repeat instructions the number of times
STOCKING PATTERN (frontside):
Using gingerbread colored yarn and a 7mm Clover Amour hook:
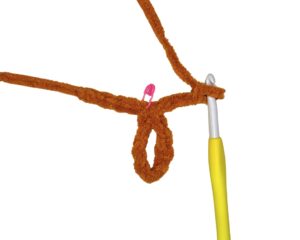
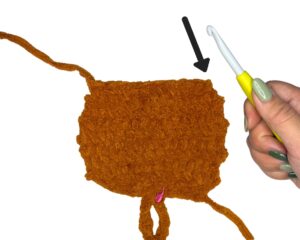
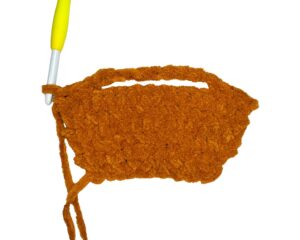
- Row 1: Make a slipknot and ch 5, mark the current st with a stitch marker, ch 10 and slst into the marked st (hanging loop), ch 5, turn, work into the second ch from the hook, sc into the next 9 ch including the ch with the stitch marker, turn [9][img]
- Row 2: ch 1, (inc, 2 sc) x3, turn [12]
- Row 3: ch 1, (inc, 3 sc) x3, turn [15]
- Rows 4-8 (5 rows total): ch 1, 15 sc, turn [15]
- Row 9: *do NOT ch 1*, skip the first st and work into the next, sc into the next 4 sts, (dec, 3 sc) x2, turn [12]
- Note: Skipping the ch 1 creates a smoother decrease.
- Row 10: *do NOT ch 1*, skip the first st, work into the next st, sc into the next 3 sts, (dec, 2 sc) x2 [9]
Fasten off and leave a short tail. Next, we will crochet the arms.
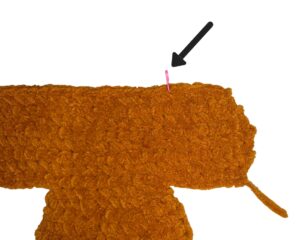
- Row 11: broken down into steps for deeper clarity
- Step 1: Position the head so that the hanging loop is closer to you. [img]
-
- Step 2: Using new yarn, make a slipknot and ch 7
- Step 3: Work into the corner st of the head and sc into the next 9 sts
- Step 4: ch 8, turn [23]
- Note: We combined the “ch 1” into the first step – the last ch isn’t included in the st count.
- Row 12: work into the second ch from the hook, 23 sc, turn [23]
- Row 13: ch 1, inc, 21 sc, inc, turn [25]
- Rows 14-15 (2 rows total): ch 1, 25 sc, turn [25]
- Row 16: *do NOT ch 1*, skip the first st and work into the next st, 24 sc, turn [24]
- Row 17: *do NOT ch 1*, skip the first st and work into the next st, 23 sc, turn [23]
- Row 18: *do NOT ch 1*, skip the first st and work into the next st, 22 sc, turn [22]
- Row 19: *do NOT ch 1*, skip the first st and work into the next st, 21 sc, turn [21]
Fasten off and leave a short tail.

Count the 5th st of the previous row and mark it with a stitch marker. Join new yarn to crochet the body.
- Row 20: standing sc, 12 sc, turn [13]
- Row 21: ch 1, inc, 12 sc, turn [14]
- Row 22: ch 1, inc, 13 sc, turn [15]
- Row 23: ch 1, inc, 14 sc, turn [16]
- Row 24: ch 1, inc, 15 sc, turn [17]
- Row 25: ch 1, inc, 16 sc, turn [18]
Next, we will make one of the legs.
- Rows 26-28 (3 rows total): ch 1, 9 sc, turn [9]
- Row 29: *do NOT ch 1*, skip the first st and work into the next, 8 sc, turn [8]
- Row 30: *do NOT ch 1*, skip the first st and work into the next, 7 sc, turn [7]
- Row 31: *do NOT ch 1*, skip the first st and work into the next, 6 sc, turn [6]
Fasten off and leave a short tail.
Join new yarn where the inner leg is.
Repeat rows 26-31 to create the second leg.
Fasten off and leave a short tail of the second leg.
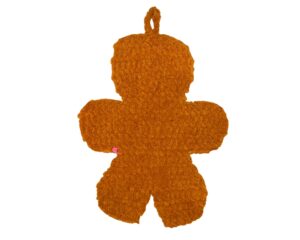
GINGERBREAD PATTERN (backside):
Using gingerbread colored yarn and a 7mm Clover Amour hook:
Make a slipknot and ch 10, turn [9]
- Row 1: work into the second ch from the hook, sc into the next 9 ch, turn [9]
- Row 2: ch 1, (inc, 2 sc) x3, turn [12]
- Row 3: ch 1, (inc, 3 sc) x3, turn [15]
- Rows 4-6 (3 rows total): ch 1, 15 sc, turn [15]
In the next row, we will create the stocking opening.
- Row 7: ch 1, 3 sc, ch 9, skip 9 sts, 3 sc, turn [15]
- Row 8: ch 1, (both loops) 3 sc, (blo) 9 sc, (both loops) 3 sc [15]
- Row 9: *do NOT ch 1*, skip the first st and work into the next, sc into the next 4 sts, (dec, 3 sc) x2, turn [12]
- Row 10: *do NOT ch 1*, skip the first st and work into the next, sc into the next 3 sts, (dec, 2 sc) x2 [9]
Fasten off and leave a short tail. Next, we will create the arms.
Follow the instructions for the frontside starting from row 11 until the end to complete the back panel.
PEPPERMINT BUTTONS PATTERN:
Start in red cotton yarn and a 2.75mm Clover Amour hook, make two:
*Note: Just as you normally do for color changes, be sure to pull up the next color on the final yarn over for each dc stitch.
- Round 1: (red) Make a magic circle and ch 2 (this will count as the first dc), dc, (white) 2 dc, *(red) 2 dc, (white) 2 dc* x2 [12]
Be sure to complete the final dc in red yarn. Use the invisible finish and secure all of the loose yarn tails into a knot on the backside. Cut the excess tails.
ASSEMBLY:


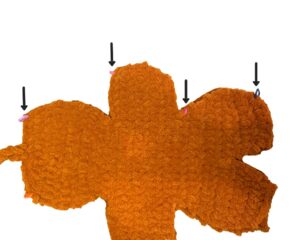
- Eyes: On the front panel, insert the safety eyes between rows 7-8, 7 sts apart.
- Note: The backings will be visible from the stocking opening. You can either melt them down (caution with using a lighter) or opt for cutting out felt eyes instead.
- Nose: Use hot glue to secure the pom pom nose in between the eyes.
- Eyebrows/Mouth: Cut 18 in. [~46 cm] of white #6 super bulky yarn to embroider with. Using your Clover darning needle, weave from the backside to the front and embroider two eyebrows, 2 sts wide and a mouth, 3 sts wide. You can use a tiny dab of hot glue to secure the smile in place. Secure the yarn tails into a knot.
- Note: Play around with different expressions for more fun!
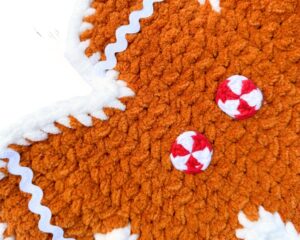
- Peppermint buttons: Use hot glue to secure the buttons onto the body, 2 rows apart.
- Icing details: Measure and cut ric rac trim for each of the limbs. Use hot glue to secure in place.
- Optional: You can also use white #6 super bulky yarn to create a similar effect!
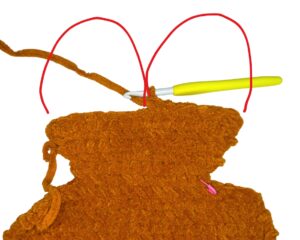
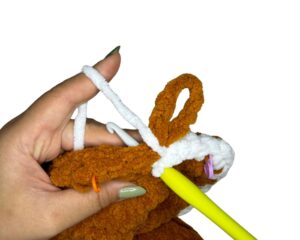
Next, we will single crochet the two panels together and create a piped outline with white #6 super bulky yarn.
- Step 1: Position the front and back panels together with the details on the outside.
- Step 2: Attach stitch markers to hold the two pieces together around the project.
- Step 3: Join White yarn in any st on the edge and be sure to crochet over all tails as you crochet the piped border. Be sure to position the hanging loop to the back when you pass it.
- Step 4: Use the invisible finish and weave in the remaining ends.

You’re finished! This makes the perfect stocking to hold all of your favorite Clover goodies. Use medium worsted yarn to create an adorable gift card sized gingerbread stocking! We’d love to see your creations over on social media. Tag your creations with @cloversquad and @curiouspapaya to share your makes 🙂
If you want to keep up with me, Amy, on social media for other fun projects, follow me on: Instagram
If you want to keep up with all things Clover, follow us on: Facebook | Twitter | Instagram | Pinterest | YouTube | Ravelry